StarCluster’s load balancer grows and shrinks an Oracle Grid Engine cluster according to the length of the cluster’s job queue. When the cluster is heavily loaded and processing a long job queue, the load balancer can gradually add more nodes, up to the specified max_nodes, to distribute the work and improve throughput. When the queue becomes empty, the load balancer can remove idle nodes in order to save money. The cluster will shrink down to a single node, the master, terminating all of the other nodes as they become idle.
You must already have a cluster running in order to use StarCluster’s load balancer. Once you have a cluster running you can load balance the cluster by passing the name of the cluster to the loadbalance command:
$ starcluster loadbalance mycluster
This will start the load balancer in an infinite loop running on your local machine. The load balancer will continuously monitor the cluster’s Oracle Grid Engine queue and determine whether it should add or remove nodes to the cluster or not. A running load balancer session can be safely stopped at any time by pressing CTRL-C. A new load balancing session can be resumed later simply by re-executing the above command.
If a cluster that’s being load balanced experiences a heavy load for a sustained amount of time, the load balancer will begin adding nodes continuously in order to reduce the load. Once the cluster size has reached an upper-bound limit the load balancer will stop adding new nodes even if it thinks another node should be added. Conversely, if the cluster is idle for a prolonged amount of time the load balancer will begin removing nodes to reduce costs. Once the cluster size has reached a lower-bound limit the load balancer will stop removing nodes.
By default, the upper-bound, is set to the original CLUSTER_SIZE used when creating the cluster and the lower-bound is set to one. This means that the number of nodes in the cluster will fluctuate, by default, between 1 and CLUSTER_SIZE as necessary to optimize for cost and performance.
You can change the upper-bound limit, or maximum number of nodes, using the -m or –max_nodes option:
$ starcluster loadbalance -m 20 mycluster
The above command tells the load balancer to increase the size of the cluster as necessary up until there are twenty nodes in the cluster.
You can also change the lower-bound limit, or minimum number of nodes, using the -n or –min_nodes option:
$ starcluster loadbalance -n 3 mycluster
The above command tells the load balancer to decrease the size of the cluster as necessary until there are three nodes in the cluster.
By default the load balancer will add a single node at a time when adding new nodes to the cluster. This allows the load balancer to gradually make a change and observe the impact on the queue without adding excessive resources. However, if you’d like to increase the number of nodes added when the load balancer determines more nodes are necessary use the -a, or –add_nodes_per_iter, option:
$ starcluster loadbalance -m 20 -a 2 mycluster
The above command will load balance mycluster up to a maximum of twenty nodes by adding two nodes at a time as necessary.
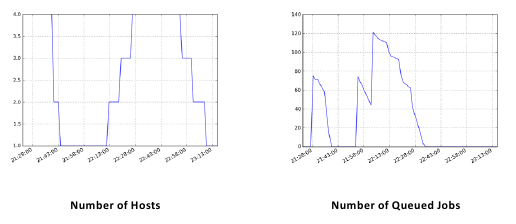
The loadbalance command supports outputting various load balancing stats over time such as the number of nodes, number of running jobs, number of queued jobs, etc. while it’s running:
To plot these stats over time in png format:
$ starcluster loadbalance -p mycluster
By default, this will generate the plots as png images in $HOME/.starcluster/sge/<cluster_tag>/. You can change where the load balancer outputs the images using the -P option:
$ starcluster loadbalance -p -P /path/to/stats/imgs/dir mycluster
You can also dump the raw stats used to build the above plots into a single csv file:
$ starcluster loadbalance -d mycluster
The above command will run the load balancer and output stats to a csv file. By default the stats are written to $HOME/.starcluster/sge/<cluster_tag>/sge-stats.csv, however, this can be changed using the -D option:
$ starcluster loadbalance -d -D /path/to/statsfile.csv mycluster
You can of course combine all of these options to generate both the plots and the raw statistics:
$ starcluster loadbalance -d -p mycluster
The following parameters are also available for fine-tuning, however, the majority of users shouldn’t need them:
The load balancer, by default, will not kill the master node in order to keep the cluster alive and functional. However, there are times when you might want to destroy the master if the cluster is completely idle and there are no more nodes left to remove. For example, you may wish to launch 10000 jobs and have the cluster shutdown when the last job has completed. In this case you can use the experimental -K, or –kill-cluster, option:
$ starcluster loadbalance --kill-cluster mycluster
The above command will load balance mycluster as usual, however, once all jobs have completed and all worker nodes have been shutdown by the load balancer the cluster will be terminated.
There is a polling loop that runs every 60 seconds by default. The polling loop interval can be tuned using the -i configuration option discussed in the previous section. Every polling interval the load balancer will connect to the cluster, obtain statistics from Oracle Grid Engine, and decide whether or not to add or remove nodes based on the current job queue. The load balancer only deals only with the queue length and active machines. Currently the load balancer only supports monitoring the default queue, “all.q”. Future releases will support balancing arbitrary once pull request 20 has been merged.
The diagram below illustrates the decisions that the load balancer will make in each loop:
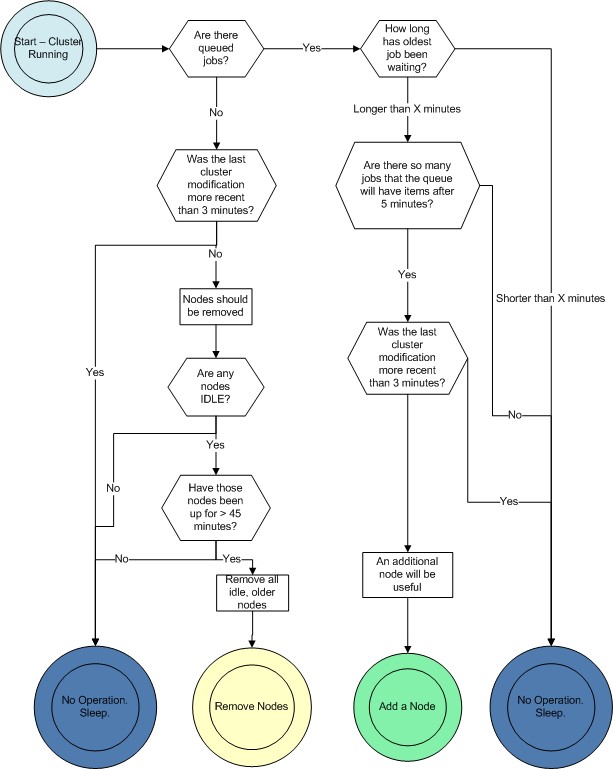
A node will be added when all of the following criteria have been met:
A user can set the number of nodes to be added per iteration. For instance, if the user wanted to add 1 node per iteration, which is standard and a recommended practice, they would set the –add_nodes_per_iteration parameter to one. If the user wanted two nodes to be added per iteration, that parameter should be set to two, and the cluster would grow at a faster rate, consequently incurring higher charges from Amazon.com.
A node will be removed when all of the following criteria have been met:
Each node in the cluster will be analyzed in turn, and any and all nodes meeting the above criteria will be terminated in that polling loop. The entire cluster need not be idle for a node to be terminated: If Node001 is working on a job, but Node002 is idle and there are no queued waiting jobs, Node002 is a candidate for termination.
Since Amazon charges by the hour, we are assuming that you have already paid for a full hour of server time. It would be wasteful to turn it off the moment it becomes idle. By keeping that node up for 45 minutes, we allow for it to complete the maximum workload from the queue, and use 75% of the hour you have already paid for.
Leaving a node up for this amount of time also increases the stability of the cluster. It is detrimental to the cluster and wasteful to be continuously adding and removing nodes.
Adding a new node is a multi-stage process:
Removing a node is also a multi-stage process:
Given that the node is immediately removed from SGE, and it seems like SGE takes about 15 seconds between a qsub command and a node beginning execution of a job, makes it very unlikely that a job will be started on a host as it is going down. There is a very small window of time within which this could happen.
To learn more about the design and development of the load balancer please see Rajat Banerjee’s master’s thesis.